Mapping software: Tiled
Mapping Guide
Basics
Making maps for Moubootaur Legends is not a task that requires a lot of knowledge but is a very good way to become creative and help the game to become more attractive. But getting started can be a little frustrating. Here is a guide that will help you to learn all the basics on how to make maps.
What is Tiled and how to get it
Tiled is a map editor that isn’t made specifically for Moubootaur Legends. That means it has a lot of options and settings we don’t need or use.
The map editor we are using is called Tiled. You can find it at https://www.mapeditor.org/.
If you have technical request, you must look at Discord
Minimum Tiled Version: 1.3.4+
We do not accept snapshot versions
Folders
You need to use a certain folder structure when mapping for TMW:
- client-data/maps
- The actual maps (tmx files)
- client-data/graphics/tilesets
- The graphics for the tilesets (png files)
- The external tilesets (tsx files)
For windows users, avoid having your clientdata folder on desktop, that cause error when adding tilesets. To avoid this issue unzip your client-data on the base of your disk like D:or C:.
Setting up the data files
To create a map, you will first need some graphics, as well as existing maps to use for reference.
You can get all the files in the right directory structure by cloning the “clientdata” project from our [[Git repository]]. [https://git.themanaworld.org/ml/clientdata]
Setting up Tiled for making TMW Maps
Map Creation
Maptutorial_Newmap
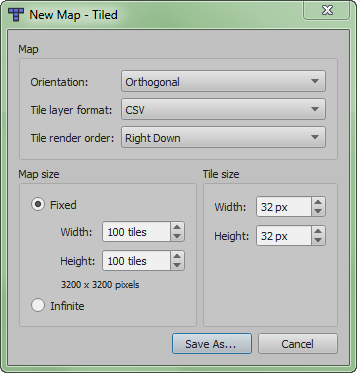
To create a new map, press File->New. Use the following settings: - Map - Map Type: Orthogonal - Tile Layer format: CSV - Tile render orded: Right Down
- Map size
- Width: 61 to 280 tiles
- Height: 41 to 280 tiles
- Tile size
- Width: 32 pixels
- Height: 32 pixels
- Map borders
- Planned: 60×35 (4K)
- Advised: 30×20 (FullHD)
- Minimum: 20×20 (HD)
Note: Server internal data range is 18×18; which is why “planned” border is rarely or never used. The borders exist so the player is always centered on the monitor no matter where they are, and the minimum map size is based on this.
Map properties
Mapping_Tutorial_Raw_Properties
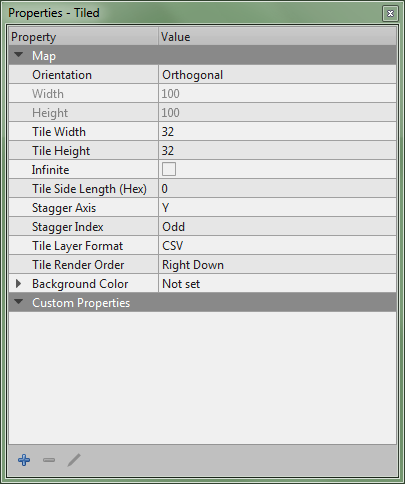
To Open map properties, go to MAP -> Map Properties… Here you can check check global information about your map like, width, height, tile size. Most important things to do its to complete the Custom Properties.
You must add them With the Blue [+] button. You can also transfer one from another map.
Here is the 6 most important lines you must add.
- The “author” line
- The “license” line
- The “manaplus version” line
- The “minimap” line
- The “music” line
- The “name” line
Some others lines could be added, but these six are a must-have.
How to fill the information
- On “author” write your name, pseudonym, or character name.
- On “license” use an open source one that suit the project, the most used nowadays is GPL 3.0 and CC BY-SA 4.0 (we do not accept new works under BY-SA 3.0)
- On “manaplus version” it should be 2, that the current version we use on Git.
- On “minimap” the path your minimap image is located, it should be graphics/minimaps/YOUR-MAP-ID.png.
- On “music”, obviously the music you want, like cavesong.ogg.
- On “name”, the map name it will be display on M+ HUD.
Setting up Layers
Maptutorial_Layers
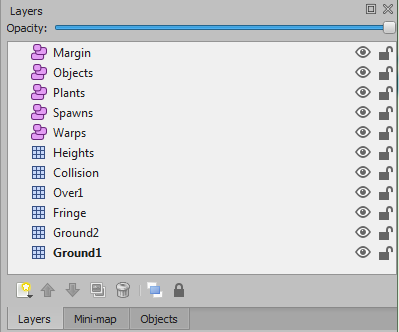
To show layer tab, view -> views and Toolbars -> Layers Layers are divided in 2 groups, Tile layer the blue square, and Object layer the pink form,
Lets first introduce Tile Layer
Tile Layers
Manaplus currently read 5 different types of Layers, which are Ground, Fringe, Over, Collision and Heights.
Ground
- The “Ground” layers are for layers under fringe. “Ground1”, the lowest level of ground, and has to be filled completely before you can call the map finished. When there are partially transparent tiles without completely opaque tiles on a layer below, strange graphic bugs will appear in the empty area. A map can have multiple “Ground” layers. They need to stick with the naming convention; Ground1, Ground2, Ground3, etc.
Fringe
- The “Fringe” Layer itself is for oversized tiles which have to be drawn in front of or behind moving objects, depending on their location. This sorting takes up CPU, making the game run slower. Thus, you should only use this layer for the tiles which have to use it. Only one Fringe layer is supported. For example, Trees are usually on the fringe layer.
In general, tilesets imported with 32x64 (aka. x2) or 32x96 (aka. x3) are all for the Fringe layer.
Over
- The “Over” layers are always drawn over the map sprites. It should be used for objects which are meant to look as if they are far above the game area. Keep in mind that there are also monsters which are larger than player characters. A map can have multiple “Over” layers. They need to conform to the naming convention “Over1”, “Over2”, “Over3”, etc.
Collision
- The “Collision” Layer isn’t displayed by default in the game. It contains information about which parts of the map are walkable and which aren’t, and also by whom. Don’t put any tiles on this layer except the one from collision tileset. The most common collision used is the red tile, which block monsters and players. Other tiles are blue (water collision), white (air collision), purple (player collision) and green (monster collision). The yellow tile is a special tile which is passable by both monsters and players, however, it allows customization by equipment when the player sits over it, and allows more complex scripts to behave differently. It is rarely used by the mapper, being almost solely of server engine usage.
Be careful: Using collision layer tiles on other layers will cause pipeline errors.
Height
- The “Height” Layer isn’t displayed in the game. This feature isn’t used widely on Moubootaur Legends because it create issues with warps. This could change in a near future.
You can use the red collision tiles to cause player to be rendered half tile above their real position; Which can be useful for stairs, however it can also cause strange glitches with graphics when misused or with certain tilesets. It also modifies the player speed (faster when coming from south, slower when coming from north), which is often undesired.
Therefore, consider the real need and sufficient skills before using this layer. You might consider locking the layer after creation to ensure you won’t accidentally place an invalid tile as unlike collision, this layer does not require a special tileset to use.
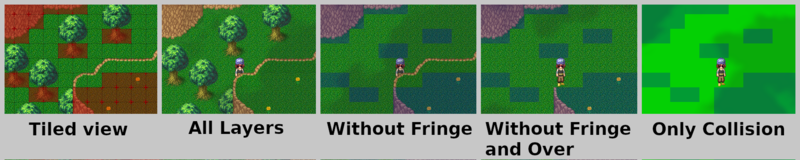
Overview
- In the game you can change your view by pressing F to obtain those results. Keep in mind that you’ll need to have yellow bar unlocked to make use of this.
Object Layers
Object layers information are converted into server data value when you run the command make maps. It’s important to be sure all of your Object size are divisible by 32 pixel or that will cause Server side error. For those who don’t have local server, ask for help on Discord #tmw2-dev
Objects layers are usually listed by alphabetical order on Moubootaur Legends.
You do not need to have them all on your map. the most common are:
- The “Help/Info” layer in Black HTML:#ff0000 0.0.0
- The “Margin” layer in Yellow #ffff00 255.255.0
- The “Objects” layer in Grey Tiled Default color
- The “Particles” layer in Pink HTML:#ff007f (255, 0, 127] (255)
- The “Plants” layer in Green HTML:#006400 0.100.0
- The “Spawns” layer in Orange HTML:#ff5500 255.85.0
- The “Warps” layer in Black HTML:#000000 0.0.0 To change Object color, layers Tab -> Right click on the layer you want to custom -> Layer Properties… -> Make your change in Color line, Left click on […] button give you access to color pallet.
Setting the layer color is not strictly required when using the Project Feature introduced in Tiled 1.4 (the project overrides the setting), however it is advised nonetheless as not all contributors are using this optional feature.
Edit Tilesets
- If you are a graphic artist planning to add more tiles to an existing tileset. This could be done with Gimp, Krita or PhotoShop.
- /! Modifying an existing tileset will change it on every map is part of.
- To avoid graphic error, tileset can only be extended in the height axis.
- This will still require all maps which use it to be updated.
- Obviously tileset have to be extended in base 32 pixels.
TODO: Importing tilesets for use (without TSX)
TSX files
Tilesets can be saved in tsx file format, but only when they are animated. Unanimated tilesets should always be imported directly on the map.
While this makes extending existing tilesets harder and also increases the disk usage, it has other side benefits both on portability as well as on CI checks.
Save your changes
When you save your changes, make sure that all objects and tileset layers are showed and unlocked. Except Heights and Collision, that should be set to hidden cause they break world feature. Heights layer can produce weird graphical glitches if misconfigured and is rarely used, consider locking it if you do not plan in using it (optional).